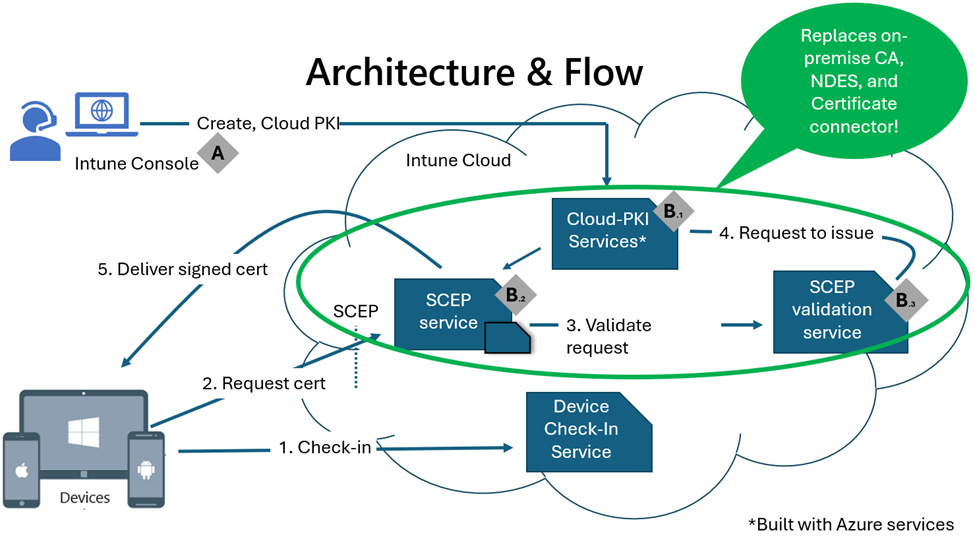
Microsoft Intune Cloud PKI
The latest addition, Microsoft Cloud PKI (Cloud PKI), brings a cloud-based service that streamlines and automates certificate lifecycle management for devices managed through Intune. Cloud PKI delivers a public key infrastructure (PKI) directly from the cloud, allowing organizations to set up a PKI environment in just a few minutes by following a few simple wizards. Even with a two-tier hierarchy involving a root certificate authority (CA) and an issuing CA, there’s no need for on-premises servers, connectors, or hardware. Cloud PKI takes care of certificate issuance, renewal, and revocation for Intune-managed devices, significantly simplifying many certificate scenarios. However, it's important to note that this solution is limited to Intune-managed devices. This post will guide you through the steps to create a two-tier hierarchy and use this setup for deploying certificates to Intune-managed devices.
In our lab, we've already got a 2 tier PKI setup using AD CS we will sign our cloud PKI using the issuing server. If you dont have a pre-existing PKI infrastructure and would like to create root CA in the cloud Click Me.

Creating issuing CA in Endpoint Manager
Once the root CA is established, either by creating it within Cloud PKI or using a bring-your-own CA (BYOCA) approach, the next step is to set up the issuing CA. This issuing CA will handle the certificate issuance for Intune-managed devices. During its creation, Cloud PKI automatically configures the Simple Certificate Enrollment Protocol (SCEP) service, which requests certificates from the issuing CA on behalf of the Intune-managed devices. The following six steps outline the process for creating the issuing CA within Cloud PKI—a straightforward procedure that highlights the ease of use Cloud PKI offers.
- Access the Cloud PKI Settings
- Open the Microsoft Intune admin center portal.
- Navigate to Tenant admin > Cloud PKI.
- Initiate the Creation of a New Certification Authority
-
On the Tenant admin | Cloud PKI page, click Create.
- Enter Basic Information
-
On the Basics page, provide a valid name for the certification authority.
- Click Next to proceed.
- Configure the Issuing CA Settings
-
On the Configuration settings page, fill in the required details:
- CA Type: Select Issuing CA to create a new issuing CA.
- Root CA Source: Choose Intune to select the previously created root CA.
- Root CA: Select the earlier created root CA.
- Validity Period: Choose the validity period for the issuing CA (2, 4, 6, 8, or 10 years).
- Extended Key Usages: Specify the purpose of the issuing CA by selecting the necessary key usage types.
- Subject Attributes: Specify at least the Common Name (CN) to help identify the CA.
- Encryption: The key size and algorithm will be preconfigured based on the root CA’s configuration.
- Review and Finalize the Configuration
-
After completing the configuration, review the details and click Next.
- Create the Issuing CA
Confirm the settings and click Create to finalize the process. The issuing CA will now be created within Cloud PKI.

After downloading the certificates, you can easily make them trusted by using a trusted certificate profile. This profile allows you to add the certificates to a specific store on the device. Follow these eight steps to distribute the certificates to the Trusted Root Certification Authorities store:
- Access Device Configuration Settings
- Open the Microsoft Intune admin center portal.
- Navigate to Devices > Configuration.
- Create a New Policy
- On the Devices | Configuration page, click Create > New policy.
- Set Up the Profile
- On the Create a profile page, fill in the following details:
- Platform: Select Windows 10 and later.
- Profile type: Choose Templates.
- Template name: Select Trusted certificate.
- Click Create to proceed.
-
Enter Basic Profile Information
- On the Basics page, provide a unique name for the profile to distinguish it from other trusted certificate profiles.
- Click Next.
-
Configure Certificate Settings
- On the Configuration settings page, input the following details:
- Certificate file: Upload the certificate file you just downloaded.
- Destination store: Choose Computer certificate store – Root for the selected certificate file.
- Click Next.
-
Assign the Profile
- On the Assignments page, configure how the profile will be assigned to devices.
- Click Next.
- Set Applicability Rules
- On the Applicability rules page, define the rules that determine which devices the profile applies to.
- Click Next.
- Review and Create the Profile
- On the Review + create page, review all the settings.
- Once satisfied, click Create to finalize the profile.